
You may ask
What do you mean by Super Powerful?
Well, notification is a must in apps these days. This helps to grab user’s attentions as well as to inform updates.
Before explanation of the title, let’s know about notifications first. There are two kinds of notifications:
- Local Notification
- Remote Notification
As the name says, local notifications are created locally by the app where remote notifications are sent from external servers.
Each OS has it’s own system to show notifications, you can say that local notifications are not that critical to send using JAVA(for Android) and SWIFT(for IOS). But when it is react-native, you will face some problems.
The React-native way
So far, the best cross platform library is react-native-push-notifications
In this library, you have a large amount of options and customizations. It’s simple as it is:
PushNotification.localNotification({
   /* Android Only Properties */
   channelId: "your-channel-id", // (required) channelId, if the channel doesn't exist, it will be created with options passed above (importance, vibration, sound). Once the channel is created, the channel will not be update. Make sure your channelId is different if you change these options. If you have created a custom channel, it will apply options of the channel.
   ticker: "My Notification Ticker", // (optional)
   showWhen: true, // (optional) default: true
   autoCancel: true, // (optional) default: true
   largeIcon: "ic_launcher", // (optional) default: "ic_launcher". Use "" for no large icon.
   largeIconUrl: "https://www.example.tld/picture.jpg", // (optional) default: undefined
   smallIcon: "ic_notification", // (optional) default: "ic_notification" with fallback for "ic_launcher". Use "" for default small icon.
   bigText: "My big text that will be shown when notification is expanded", // (optional) default: "message" prop
   subText: "This is a subText", // (optional) default: none
   bigPictureUrl: "https://www.example.tld/picture.jpg", // (optional) default: undefined
   bigLargeIcon: "ic_launcher", // (optional) default: undefined
   bigLargeIconUrl: "https://www.example.tld/bigicon.jpg", // (optional) default: undefined
   color: "red", // (optional) default: system default
   vibrate: true, // (optional) default: true
   vibration: 300, // vibration length in milliseconds, ignored if vibrate=false, default: 1000
   tag: "some_tag", // (optional) add tag to message
   group: "group", // (optional) add group to message
   groupSummary: false, // (optional) set this notification to be the group summary for a group of notifications, default: false
   ongoing: false, // (optional) set whether this is an "ongoing" notification
   priority: "high", // (optional) set notification priority, default: high
   visibility: "private", // (optional) set notification visibility, default: private
   ignoreInForeground: false, // (optional) if true, the notification will not be visible when the app is in the foreground (useful for parity with how iOS notifications appear). should be used in combine with com.dieam.reactnativepushnotification.notification_foreground setting
   shortcutId: "shortcut-id", // (optional) If this notification is duplicative of a Launcher shortcut, sets the id of the shortcut, in case the Launcher wants to hide the shortcut, default undefined
   onlyAlertOnce: false, // (optional) alert will open only once with sound and notify, default: false
 when: null, // (optionnal) Add a timestamp pertaining to the notification (usually the time the event occurred). For apps targeting Build.VERSION_CODES.N and above, this time is not shown anymore by default and must be opted into by using showWhen, default: null.
   usesChronometer: false, // (optional) Show the when field as a stopwatch. Instead of presenting when as a timestamp, the notification will show an automatically updating display of the minutes and seconds since when. Useful when showing an elapsed time (like an ongoing phone call), default: false.
   timeoutAfter: null, // (optional) Specifies a duration in milliseconds after which this notification should be canceled, if it is not already canceled, default: null
 messageId: "google:message_id", // (optional) added as message_id to intent extras so opening push notification can find data stored by @react-native-firebase/messaging module.
 actions: ["Yes", "No"], // (Android only) See the doc for notification actions to know more
   invokeApp: true, // (optional) This enable click on actions to bring back the application to foreground or stay in background, default: true
 /* iOS only properties */
   category: "", // (optional) default: empty string
 /* iOS and Android properties */
   id: 0, // (optional) Valid unique 32 bit integer specified as string. default: Autogenerated Unique ID
   title: "My Notification Title", // (optional)
   message: "My Notification Message", // (required)
   userInfo: {}, // (optional) default: {} (using null throws a JSON value '' error)
   playSound: false, // (optional) default: true
   soundName: "default", // (optional) Sound to play when the notification is shown. Value of 'default' plays the default sound. It can be set to a custom sound such as 'android.resource://com.xyz/raw/my_sound'. It will look for the 'my_sound' audio file in 'res/raw' directory and play it. default: 'default' (default sound is played)
   number: 10, // (optional) Valid 32 bit integer specified as string. default: none (Cannot be zero)
   repeatType: "day", // (optional) Repeating interval. Check 'Repeating Notifications' section for more info.
 });
You will notice that this library also tells about remote notifications. We gonna dive into that soon!
Remote Notifications – The Player
Remote notifications are very popular and used by every tech giant. The best tool for this is Firebase Cloud Messaging. Hopefully, this is Free
Firebase cloud messaging(FCM) is available for almost all OS, including Android, IOS, Web and more.
All you need is an app in firebase, firebase cloud messaging sdk installed in your app. You can then start sending remote notifications. There are facility of targeted messages too!

Firebase – Google
Hybrid Notification – Remote and Local combined
Finally… This is what I called super powerful! Why?
FCM is pretty powerful. But the problem is, nowadays, notifications are something more than texts. See below-
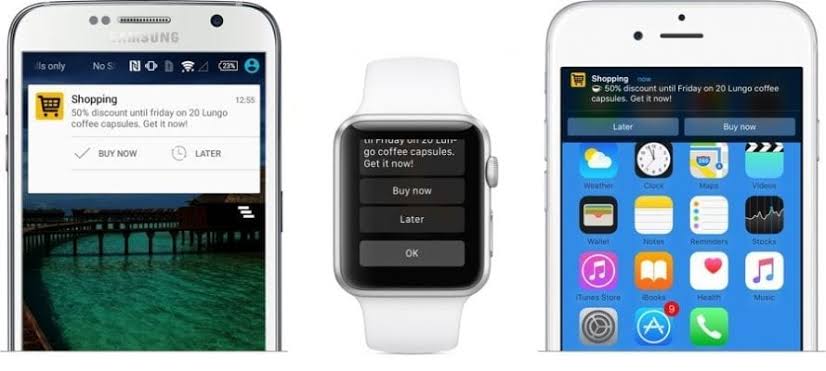
Besides, there are images, texts, logo, video, audio and more!
And sadly, you can’t do these using FCM. Firebase will allow you to do targeting, adding extra data, but won’t enable you to make the notifications smart. That’s why, we take help of Local Notification to make it more customizable.
Step 1: Send Remote Message
The first step is to send a remote notification. It’s simple:
const registrationTokens = ['YOUR_REGISTRATION_TOKEN_1',// …'YOUR_REGISTRATION_TOKEN_N',]; //required for targeted sendingconst message = {data: {score: '850', time: '2:45'},tokens: registrationTokens,}admin.messaging().sendMulticast(message).then((response) => {console.log(response.successCount + ' messages were sent successfully');
Check Examples in More Languages
Note, we are sending data notifications. These messages are not displayed anywhere, but you can use these data from system trey.
Remember, I consider you have already set up firebase admin sdk. So, I didn’t show it.
Step 2: Receive Message
Now, it’s time to receive the data. You need to have firebase messaging sdk in your react-native app.
Now, we listen for background messages in index.js file.
// index.js
 import { AppRegistry } from 'react-native';
 import messaging from '@react-native-firebase/messaging';
 import App from './App';
 // Register background handler
 messaging().setBackgroundMessageHandler(async remoteMessage => {
   console.log('Message handled in the background!', remoteMessage);
 }); //remoteMessage is the object with the data we sent from server
 AppRegistry.registerComponent('app', () => App);
So, the rest is easy. We will make a new local notification inside the handler function 😉
// index.js
 import { AppRegistry } from 'react-native';
 import messaging from '@react-native-firebase/messaging';
 import App from './App';
 // Register background handler
 messaging().setBackgroundMessageHandler(async remoteMessage => {
   PushNotification.localNotification({
   //… You can use all the options from localNotifications

   title: remoteMessage.data.user + ' Posted Something', // (optional)
message: "Check on App",//(required)
//add buttons, input, image, more text, vibrations, color, logo and more!
 });
 });
 AppRegistry.registerComponent('app', () => App);
You are done!!
You should now make a foreground message handler in App.js file and manage them in the way you want!
Hope this helps, let me know if have more questions in comment section below!
